")

Interested in providing your students (or kids!) with meaningful computer science experiences without a robot? Check out ShapeTracer 1, Ozobot’s free robot simulator game! This blog post will guide you through all 10 levels of ShapeTracer with tips and tricks for teaching the content. By programming a virtual Ozobot through each level, students in grades 2 and up will be introduced to core computer science concepts like sequencing and debugging.
Where can I find ShapeTracer 1?
To use ShapeTracer, you’ll need a computer with a web browser or a tablet (iPad 3 or newer and Android tablets). Find it (along with other Ozobot learning games) at ozobot.com/create/games. Or, go to ozobot.com and:
- Select Create
- Select Games
- Select ShapeTracer 1
Getting Started
Now you’re ready to begin! Let’s jump right in. Give your students a general Overview:
ShapeTracer 1 is a block-based programming tool for students. They can program and code with no bot required. Here are some general tips and tricks:
- The Goals section gives directions for each level. Generally, the goal is to program the bot to trace the colored line shown in the robot Simulator by programming it with the OzoBlockly blocks in the left panel.
- The Simulator is in the upper right panel.
- There are 10 levels/goals total.
- Students will receive feedback on whether their program was:
- correct,
- correct with the opportunity to make their program more efficient by using fewer blocks,
- or incorrect
- Once all 10 stages are completed, students can unlock a printable activity.
- Robots are not needed, but if students have access to Ozobots, they can use the flash loading feature.
- All code blocks needed for each level are in the left panel.
- Any speed will work in the movement blocks.
Level 1 Tips and Tricks:
- Remind students to use a Light Effects block and “set light color” to match the line in the Simulator before each movement.
- Explain to students that each square in the grid represents 1 step for Ozobot.
- The large, darker squares represent 5 steps.
- Orientation of the bot: round shape represents the back wheel hubs.
- Pose some guiding questions:
- How can you quickly tell how far the bot needs to move?
- Answer: If the dark gray grid lines represent 5 steps, double that would be 10 steps.
- How can you quickly tell how far the bot needs to move?
Level 2 Tips and Tricks:
- Before starting this level, review directionality (right, left) with students
- Remind students that orientation matters! Ask students to think about which way the bot is facing to determine direction.
- Make Math connections:
- right/left = right angle/ 90 degree turn
- slight right/slight left= 45 degree turn
- Shortcut: Right click on any block and click duplicate to easily make copies of code in your workspace.
Level 3 Tips and Tricks:
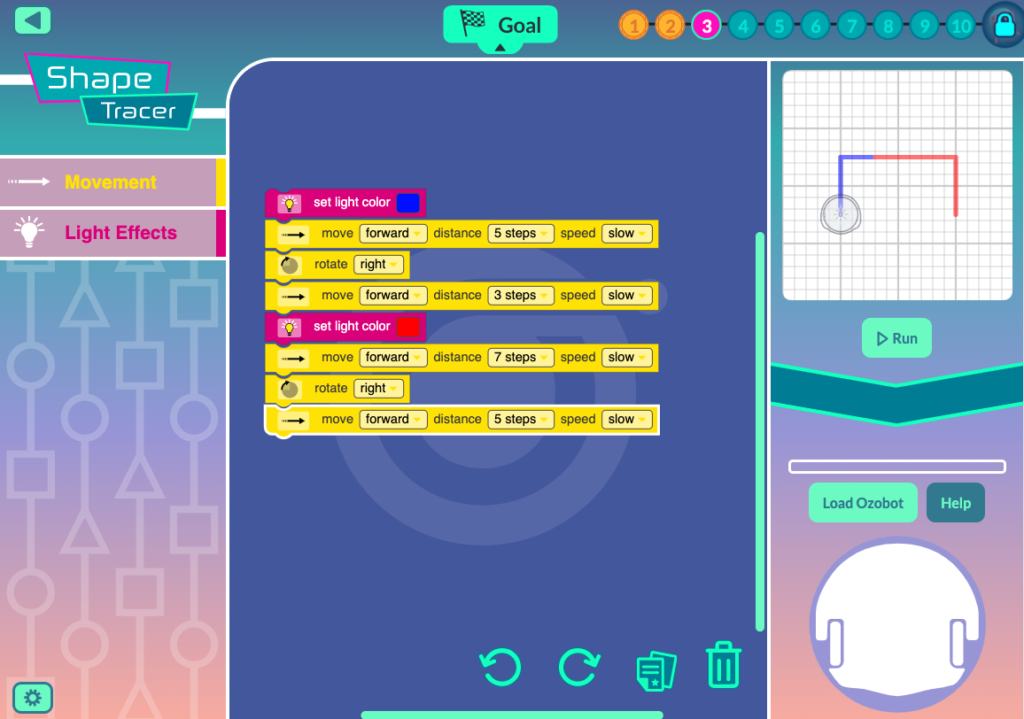
- Encourage testing and debugging.
- Make a Math connection:
- Partners to 10: “If we know the whole segment is 10, and the blue portion is 3, what is the red portion?”
- Remind students to set light color before coding each movement.
- Shortcut: Right click on any block and click duplicate to easily make copies of code in your workspace.
Level 4 Tips and Tricks:
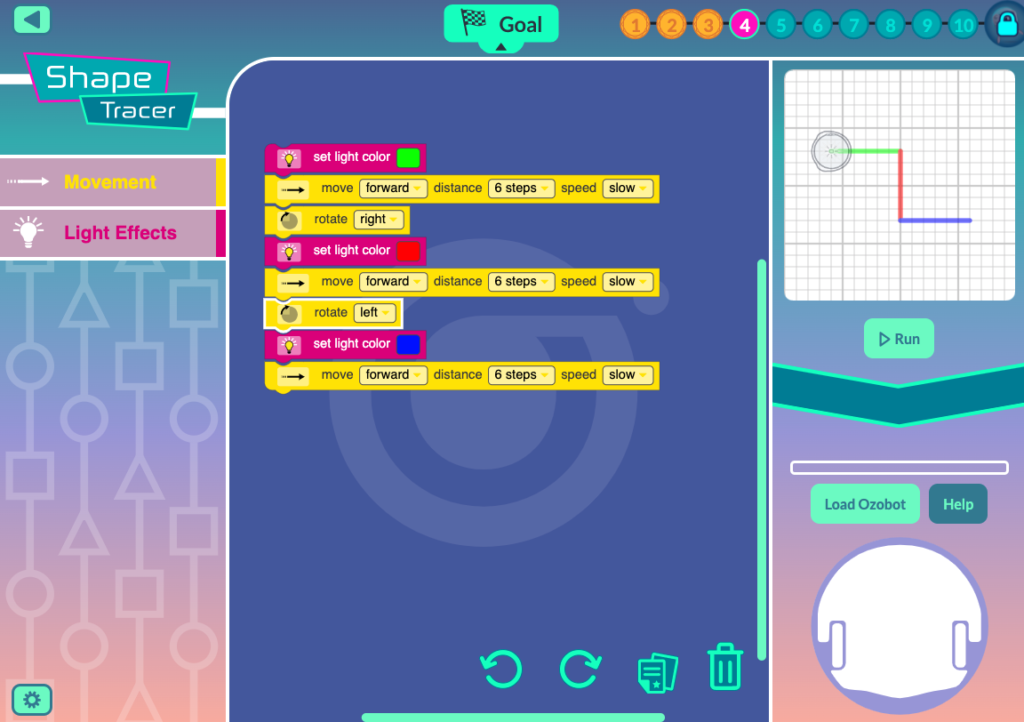
- Make a Math connection:
- Estimation: “If we know the whole segment is 5, and the color segment is slightly longer, what number would make sense?”
- Remind students to set light color before coding each movement.
- Testing is your friend! Encourage students to test each segment so they reduce debugging later.
Level 5 Tips and Tricks:
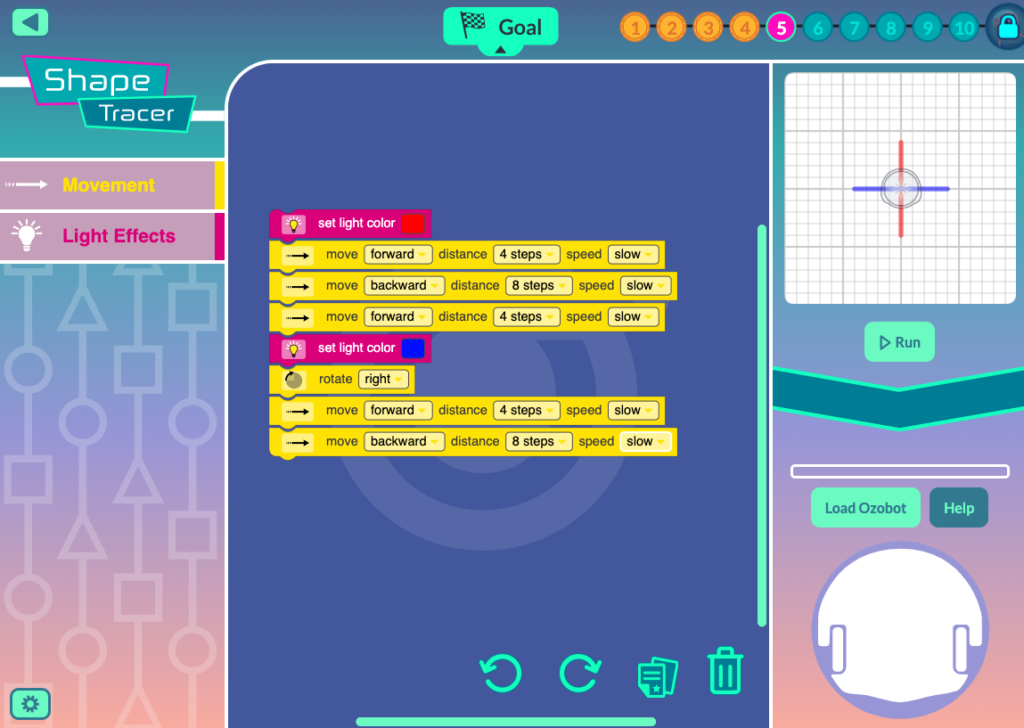
- Pay careful attention to the length of the segments.
- Make a Math connection:
- “If the bot moves forward 4 steps, and moves double the amount backward, how many steps does it need to move backward?”
Level 6 Tips and Tricks:
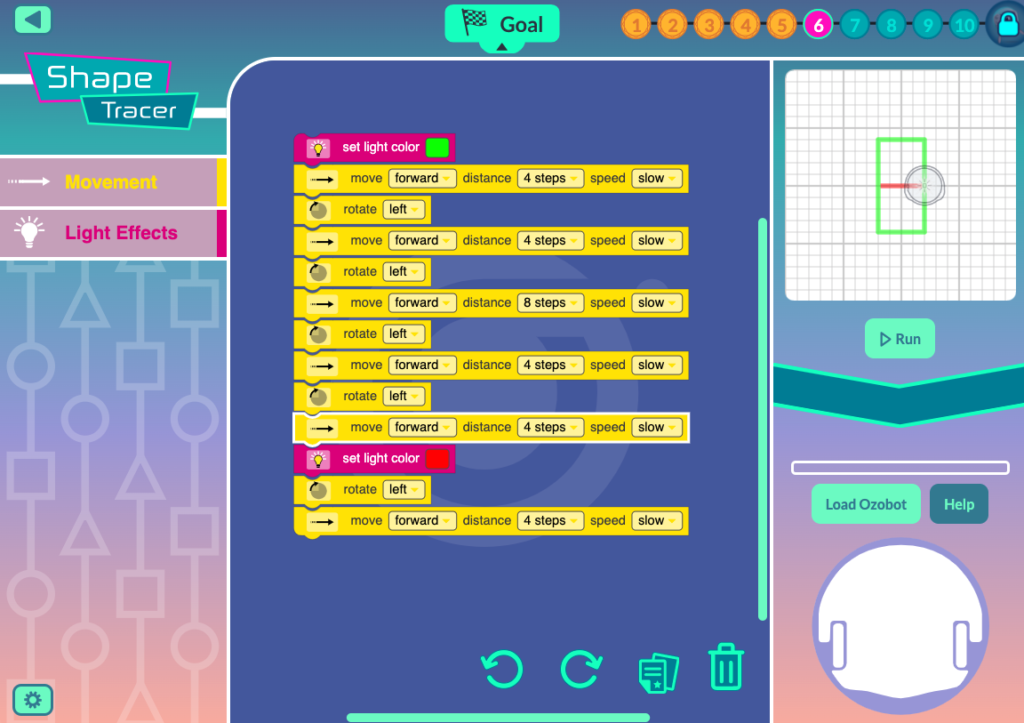
- There are multiple solutions, but encourage students to use the least number of blocks.
- Hint: Turns require a movement block, so utilize the bot’s directionality in the robot Simulator to your advantage!
Level 6 alternative solution with more blocks:
- This code has the bot tracing the red line first. It utilizes one extra block due to the turn required in the second block.
Level 7 Tips and Tricks:
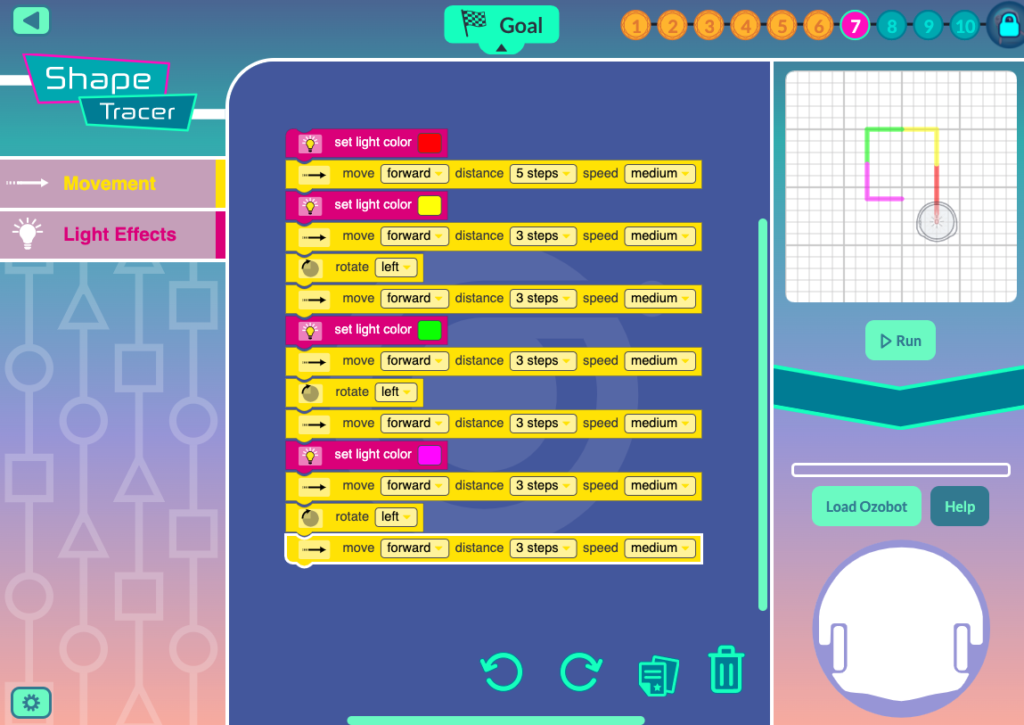
- Make a Math Connection:
- Subtraction: Using the dark gray grid, model how to use subtraction to find the length of the segments.
Level 8 Tips and Tricks:
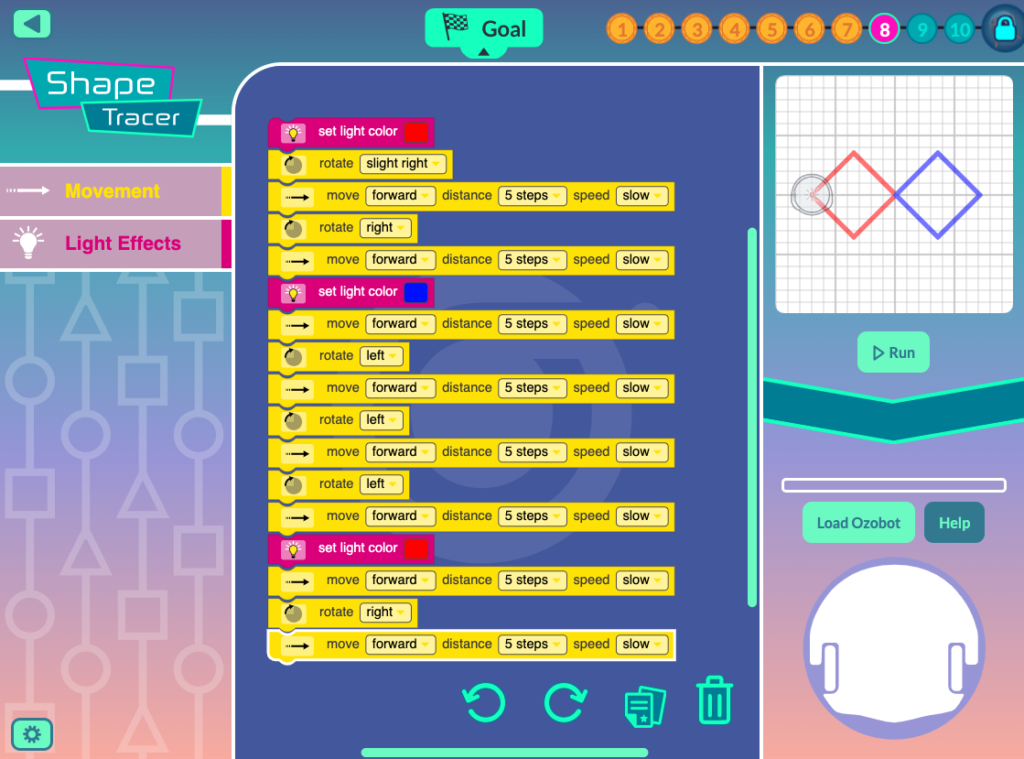
- Make Math connections:
- Angles:
- slight right/sight left = 45 degrees
- right/left = 90 degrees
- Geometry:
- The rhombus shapes are the same size as the 5 X 5 squares.
- Logic:
- “What is the shortest path to completion?”
- Angles:
- “Does it make more sense to trace the red square first, then move to the blue square? Or is there an alternative path?”
Level 9 Tips and Tricks:
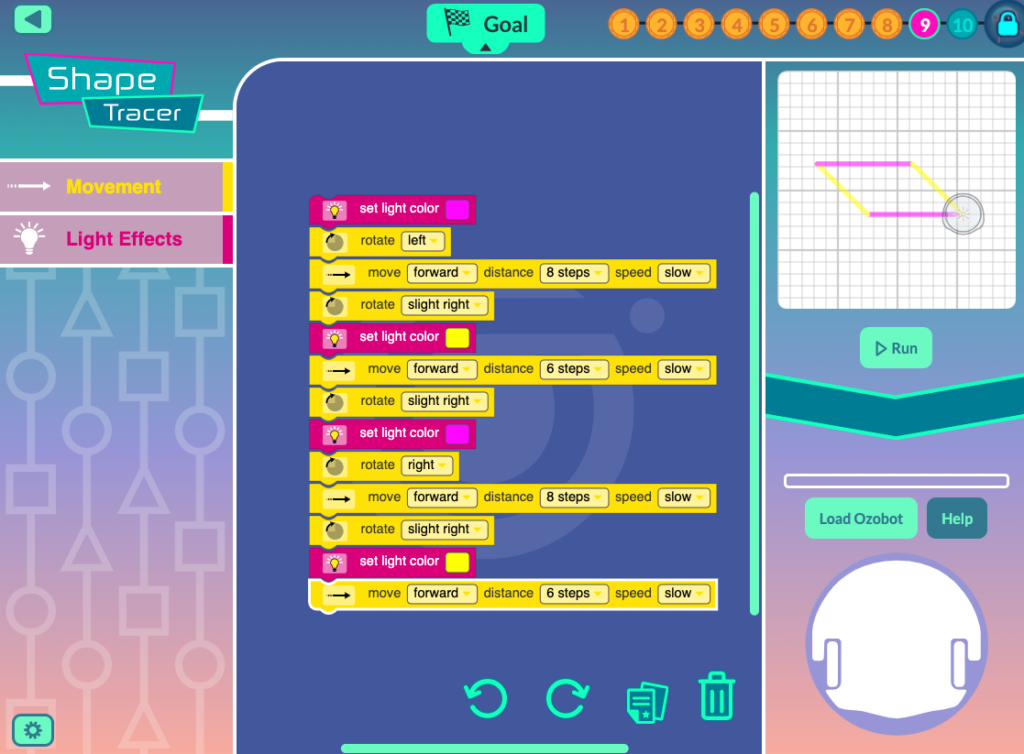
- Make a Math connection:
- Angles
- Some turns are less than 90 degrees, so the “slight right” needs to be utilized.
Level 10 Tips and Tricks:

- Make a Math connection:
- Angles
- Some turns are less than 90 degrees, so the “slight right” needs to be utilized.
- Angles
- For the turns greater than 90 degrees, “sight right” + “right” need to be utilized together.
Great! You’ve completed all steps in ShapeTracer 1! Now, how can you use this tool with your students? If you are teaching in a virtual classroom, we have two recommended pathways:
- Step-by-step I do, we do, you do model:
- Model each step for the students, and have them follow along on their devices. Once they understand the content, release them to complete stages on their own.
- Assign ShapeTracer 1 as independent practice for students:
Come back and discuss
- “What was easy?”
- “What was hard? What strategies did you use to figure out the issue?”
- “How did you solve the challenges?”
- “Was there one level where you tried multiple solutions?”
- Have students screenshot different solutions and share their thinking.
Have fun with the ShapeTracer 1 robot simulator, and come back to check out posts about ShapeTracer 2 and OzoTown. They’re coming soon!